Step by Step Wedding DJ Setup for Great Receptions
- Wix Team legend
- Jan 13
- 8 min read

Selecting the right American DJ setup can transform an ordinary Texas wedding into a memorable celebration. Over 85 percent of couples say professional entertainment is the factor that makes their reception truly stand out. With so many venue layouts and technical needs, knowing how to plan each step matters for a flawless event. This practical guide unlocks must-have strategies to organize, connect, and test both sound and lighting, giving your wedding reception an unforgettable rhythm.
Table of Contents
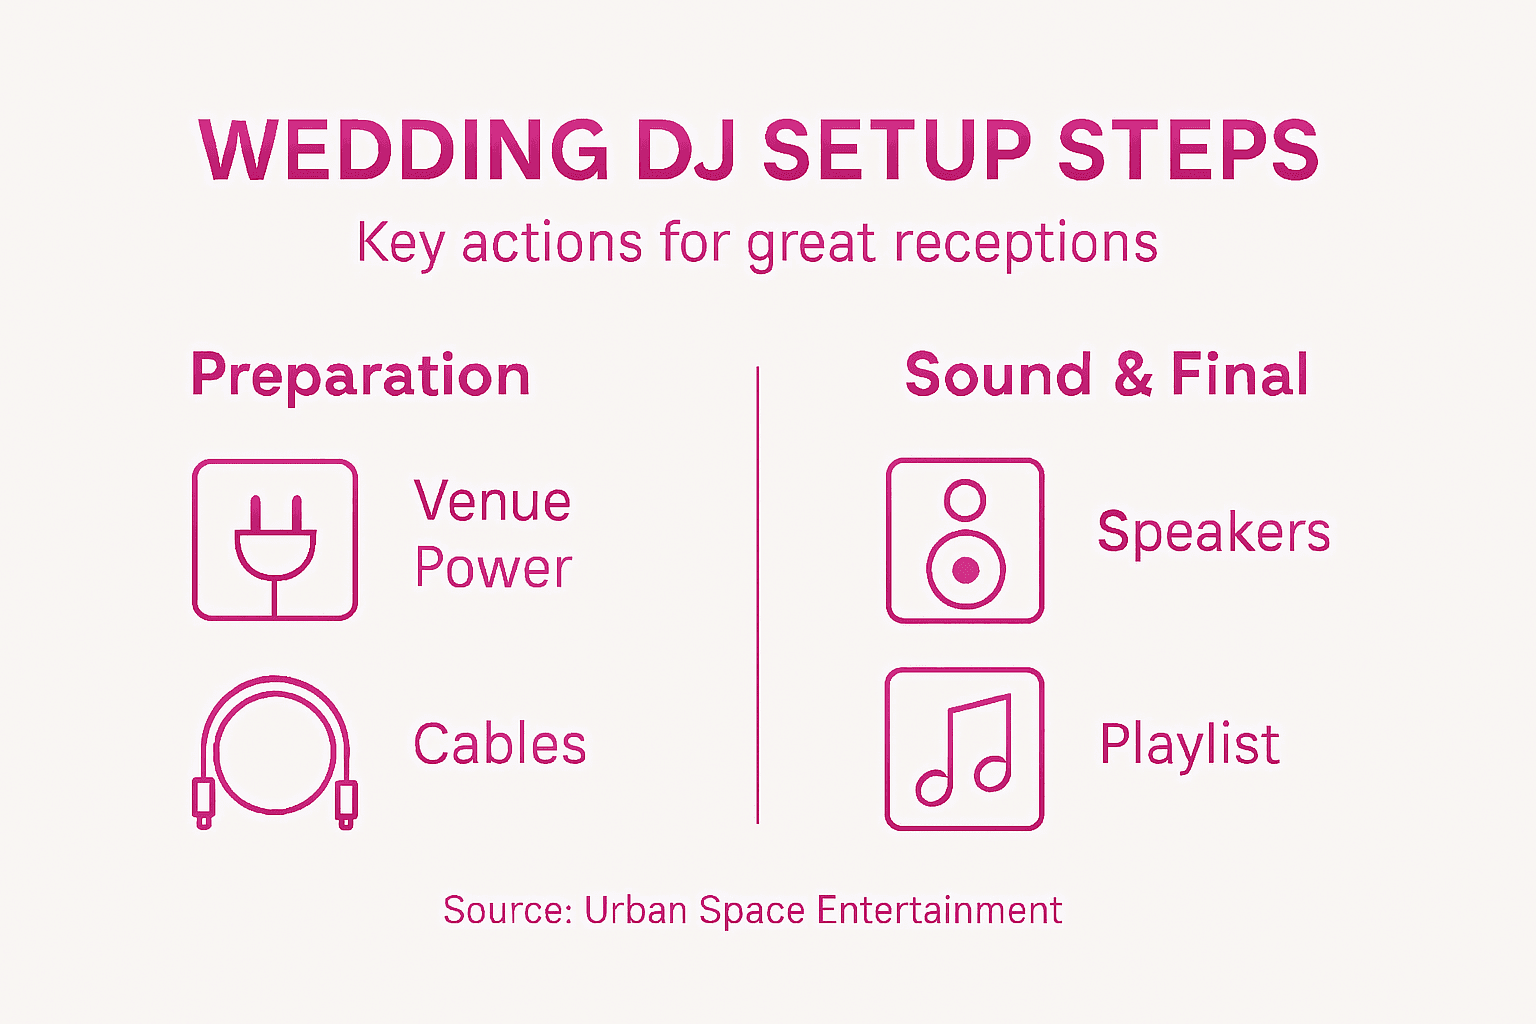
Quick Summary
Key Point | Explanation |
1. Assess Venue Power Needs | Understand the venue’s electrical capabilities and requirements to avoid sound issues and ensure a smooth reception. |
2. Organize Equipment and Cables | Arrange DJ gear strategically to prevent clutter and allow quick access, enhancing overall performance during the event. |
3. Properly Position Speakers | Place speakers and the DJ booth for optimal sound coverage and to avoid obstructing guests’ views and pathways. |
4. Secure Audio Gear Connections | Meticulously connect and secure all equipment to prevent interruptions and maintain clear audio throughout the event. |
5. Test Sound Levels and Lighting | Calibrate audio and lighting settings to create an immersive atmosphere, checking for clarity and comfort across the venue. |
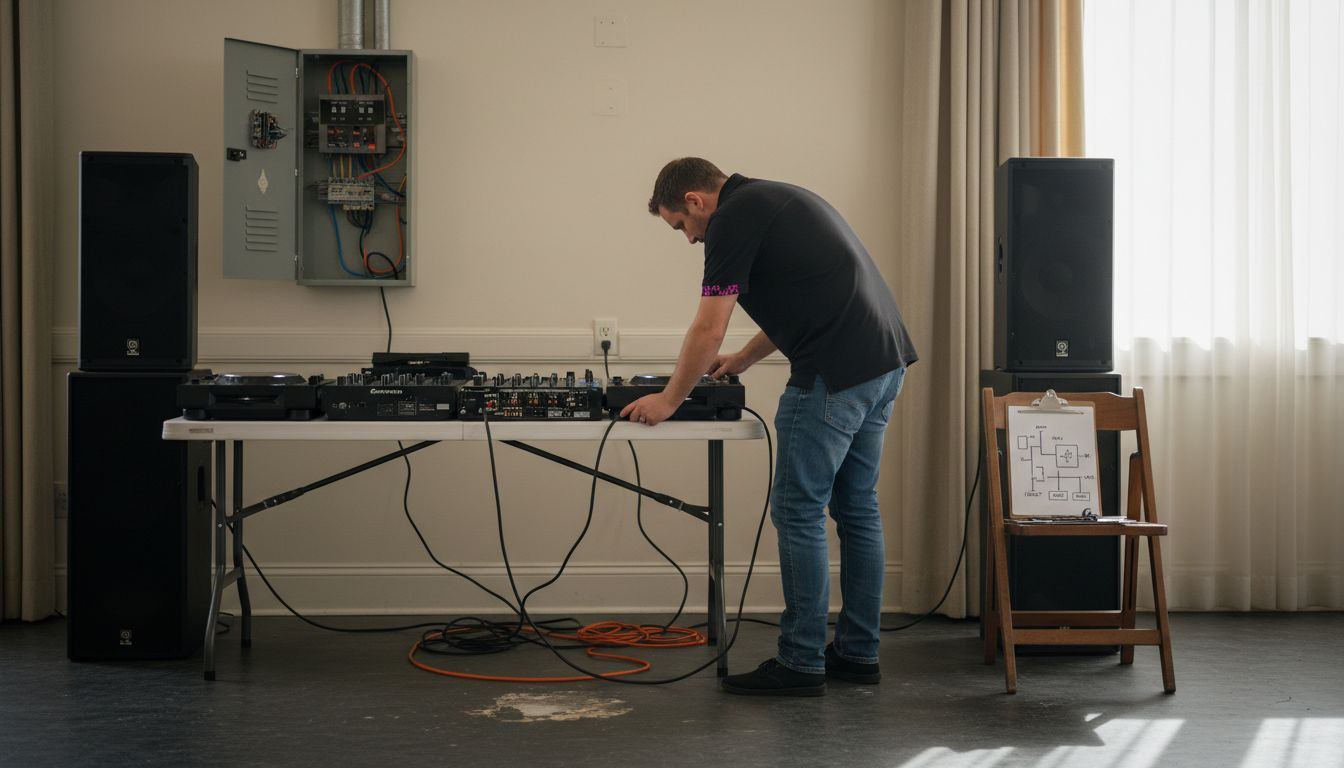
Step 1: Assess Venue and Power Needs
Successfully setting up your wedding DJ equipment starts with understanding the venue’s electrical capabilities. Knowing your power requirements prevents potential sound system disasters and ensures smooth musical entertainment throughout your reception.
Carefully evaluate the venue’s electrical infrastructure by first determining electrical needs. Walk the space and locate available power outlets, checking their amperage and proximity to your planned setup area. Most professional sound systems require dedicated circuits with sufficient wattage to handle speakers, mixers, lighting equipment, and amplifiers. Measure the distance between outlets and your intended equipment placement to ensure you have adequate extension cords and power strips.
Always communicate directly with your venue coordinator about power specifications. Request a diagram of electrical zones and ask about any restrictions or limitations on equipment setup. Some venues have specific rules about power usage or may require additional electrical support for complex sound systems.
Pro tip: Bring a portable power meter to verify outlet voltage and prevent potential electrical overloads during your wedding reception.
Step 2: Organize Equipment and Cables
Creating a professional and efficient wedding DJ setup requires strategic equipment organization that keeps your performance smooth and your workspace tidy. Your goal is to arrange gear in a way that looks polished while ensuring quick access and minimal cable clutter.

Start by preparing your DJ equipment carefully, mapping out your setup area in advance. Group cables into organized bundles using velcro straps or cable ties to prevent tangling and reduce tripping hazards. Position your mixer, laptop, and primary sound equipment within easy reach, creating a central control zone that allows seamless music transitions. Arrange speakers symmetrically to provide balanced sound coverage across the reception space, ensuring cables run discreetly along walls or under temporary cable covers.
Plan for potential technical challenges by bringing backup cables and additional extension cords. Position your equipment to maximize functionality while maintaining a clean aesthetic that complements the wedding venue. Keep backup gear accessible but out of sight, creating a professional setup that looks effortless and intentional.
Pro tip: Color code your cable ties or labels to quickly identify different cable types and minimize setup confusion during high stress moments.
Here is a reference guide to typical wedding DJ equipment and its purpose:
Equipment Item | Primary Use | Key Benefit |
Mixer | Blend audio sources | Seamless song transitions |
Loudspeakers | Project music to guests | Full, clear sound coverage |
Laptop/Controller | Manage playlists and cues | Easy track organization |
Microphone | Announcements and speeches | Clear communication |
Lighting Controls | Manage event ambiance | Dynamic atmosphere change |
Power Strips/Cords | Supply electricity safely | Reliable equipment uptime |
Step 3: Position Speakers and DJ Booth
Creating the perfect audio landscape for your wedding reception requires strategic placement of speakers and the DJ booth to ensure optimal sound quality and guest experience. Your goal is to design a setup that delivers clear music while maintaining an unobtrusive presence in the venue.
Speaker placement techniques demand careful consideration of venue layout and guest comfort. Position your speakers at a 45-degree angle toward the dance floor, creating a wide sound coverage zone that reaches all guests without overwhelming any specific area. Place the main speakers on sturdy stands approximately 6 to 8 feet high, angled slightly downward to project sound evenly across the reception space. Your DJ booth should be situated close to the dance floor but not directly in its center, allowing you clear visibility of the crowd while providing easy access to your equipment.
Consider the venue’s architectural features when planning your setup. Avoid blocking important sightlines like the head table or stage, and route cables along walls or under temporary floor coverings to minimize tripping hazards. Test your speaker positioning during the initial setup to ensure balanced sound distribution and make subtle adjustments as needed.
Pro tip: Use gaffer tape to secure cables and create temporary pathways that protect both your equipment and your guests from accidental trips.
Step 4: Connect and Secure Audio Gear
Successfully connecting and securing your audio equipment is critical to ensuring a seamless wedding reception soundtrack. Your goal is to create a robust audio setup that prevents technical interruptions and delivers crystal clear sound throughout the event.
Connecting audio gear demands meticulous attention to detail. Start by organizing your cables and matching input and output connections systematically. Use color coded or labeled cables to quickly identify specific connections between mixers, speakers, microphones, and playback devices. Ensure each connection is snug and secure, avoiding loose plugs that could cause unexpected sound dropouts. Ground your equipment properly to minimize electrical interference and maintain clean audio quality. Double check each connection point before finalizing your setup, testing sound levels and clarity at multiple volumes.
Prepare for potential technical challenges by bringing backup cables and having a redundant connection strategy. Physically secure equipment stands and cable runs using professional mounting hardware and gaffer tape to prevent accidental disconnections during dancing or movement. Arrange cables in logical pathways that minimize tripping risks while keeping connections stable and protected.
Pro tip: Bring a small multitool with wire cutters and electrical tape to make quick repairs or cable adjustments if unexpected connection issues arise during the reception.
Step 5: Test Sound Levels and Lighting
Perfecting your wedding reception’s audio and visual experience requires careful calibration of sound levels and lighting to create the right atmosphere. Your goal is to design an immersive environment that energizes guests while maintaining technical precision.
Wedding DJ lighting and sound testing demands methodical attention to multiple technical aspects. Begin by setting baseline volume levels that provide clear sound coverage without overwhelming conversation areas. Walk the entire venue perimeter testing sound quality at different points. Adjust equalizer settings to balance bass, midrange, and treble frequencies. For lighting, program a series of preset scenes that transition smoothly between dinner ambiance, dance floor energy, and special moments like first dance. Verify that light colors and intensities complement the venue’s aesthetic while providing enough illumination for photography and guest comfort.
Simulate realistic reception conditions during your sound and lighting check. Play music at varying volumes and test lighting transitions to ensure seamless performance. Coordinate with the venue coordinator and wedding photographer to understand specific lighting requirements and potential constraints. Have backup lighting controllers and sound adapters readily available to address any unexpected technical challenges.
Pro tip: Bring a decibel meter smartphone app to precisely measure sound levels and ensure you stay within acceptable volume ranges for guest comfort.
The table below summarizes common sound and lighting testing challenges and their solutions:
Challenge | Solution | Prevention Tip |
Volume too loud in guest areas | Adjust speaker position/volume | Test levels at all locations |
Lighting glare on photos | Redirect or dim certain lights | Coordinate with photographer |
Unbalanced bass/treble | Reset and fine-tune EQ settings | Walk venue to monitor sound |
Sudden technical malfunction | Switch to backup controllers | Keep spare adapters and cables |
Step 6: Confirm Playlist and Final Details
Transitioning from technical setup to musical artistry requires a thorough review of your wedding playlist and event logistics. Your goal is to create a personalized musical journey that reflects the couple’s unique style and keeps guests entertained throughout the reception.
Wedding DJ playlist confirmation involves meticulously reviewing song selections and event timing with the couple. Schedule a final consultation to discuss must play songs, specific moment soundtracks like first dance and parent dances, and any cultural or personal music preferences. Create a comprehensive timeline that outlines exact song transitions for key reception moments. Develop a do-not play list to avoid potentially uncomfortable music selections and ensure you understand the couple’s musical taste and energy level they want to create.
Review the entire reception flow with the wedding coordinator to synchronize music with other events like toasts, cake cutting, and special announcements. Prepare backup song options in each playlist category to maintain flexibility. Confirm sound system compatibility with your prepared music files and have multiple playback methods ready as contingencies.
Pro tip: Create a digital playlist backup on a separate device and bring wireless music streaming capabilities as an additional failsafe against potential technical interruptions.
Elevate Your Wedding Reception with Expert DJ Setup and Entertainment
Setting up flawless wedding DJ equipment involves careful planning around venue power, speaker placement, sound levels, and playlist management to ensure an unforgettable celebration. If you want to avoid last-minute technical troubles and create an atmosphere where every beat flows seamlessly, trust professionals who specialize in these challenges. Urban Space Entertainment LLC understands the importance of precise audio and lighting calibration combined with personalized music curation that keeps your guests energized and your reception running smoothly.
Experience peace of mind by booking with Urban Space Entertainment. Our team handles everything from electrical setup to dynamic lighting design and playlist confirmation, so you can focus on enjoying your special day. Don’t settle for anything less than a vibrant, well-orchestrated event. Visit Urban Space Entertainment today and discover our customizable wedding DJ packages that match your vision perfectly. Take the first step to making your reception extraordinary by exploring how we turn technical expertise into memorable celebrations.
Frequently Asked Questions
What are the essential steps for setting up a wedding DJ?
Begin by assessing the venue and power needs, organizing your equipment and cables, positioning the speakers and DJ booth, connecting and securing your audio gear, testing sound levels and lighting, and confirming the playlist. This structured approach ensures a smooth reception experience.
How do I assess the electrical capabilities of my wedding venue?
Evaluate the venue by locating available power outlets and checking their amperage. Discuss your power requirements with the venue coordinator and request a diagram of electrical zones to ensure you have everything needed for your sound setup.
What should I do to organize my DJ equipment and cables?
Group your cables using Velcro straps or cable ties to minimize confusion and tripping hazards. Arrange your mixer, laptop, and speakers within easy reach to create a clean and efficient DJ booth.
How can I test sound levels and lighting effectively before the reception?
Set baseline volume levels and walk the venue to test sound quality at various points. Adjust the sound and lighting settings to create an inviting atmosphere, ensuring they are comfortable for guests while enhancing the overall experience.
What should I include in my final wedding playlist review?
Confirm must-play songs, specific soundtracks for key moments, and create a do-not-play list to respect the couple’s preferences. Collaborate with the wedding coordinator to synchronize music with the entire reception schedule for a seamless flow.
Recommended
Comments